
VMWare 6 White Box Solution
Computers are, of course, the mainstay of small IT shops such as mine. There comes a time when the number of computers starts growing faster than the business and maintenance of both the hardware and software start consuming a significant amount of time. Finding myself with the need to replace a fussy Windows file server and upgrading to 64 bit levels for current OS’s, I decided to use a VMWare 6 White Box Solution. Having used VMWare solutions before, starting with ESXi 3.1, I was pleased with the results so decided to use that for my solution.
As of this writing, VMWare is at 6.5, a long way from 3.1 so had to do a bit of learning about some of the wonderful (and not so wonderful changes) with the progression to 6.5. My 3.1 solution from years ago outlasted the hardware it was running on so I decided to give 6.5 a try. The ultimate goal of course is consolidation of my servers into one box running 24x7x365 instead of the numerous boxes running now. With that in mind, it was off to the store to shop for hardware.
Hardware
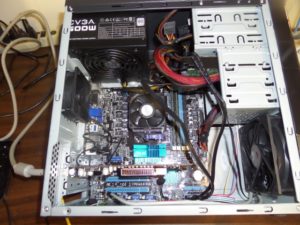
I tend to white box most of the machines I use anyway as I can get what I want with no surprises. First of course was a reasonable Motherboard, and since I like ASUS boards That’s what I went with.I picked up an ASUS M5A78L-M at Amazon for a good price and got it bundled with an AMD FX6300 6 core processor and 8G of ram for some breathing room. A power supply and cheap case rounded it all out along with a Western Digital 1TB hard drive. So much for that. Note: When you give your brand new white box it’s smoke test, get into the bios and enable the processor virtualization. Also a couple of spare 250GB drives got tossed into the mix.
VMWare Installation
Next up is installing vmware on the brand new box. After you register and get to the download page, copy and paste the license key somewhere or you’ll end up with a 60 day version. Download the 6.0 version and tuck it away somewhere. Probably wont need it, but it’s good to have. There’s some issues with 6.0 and white boxes which I’ll detail next and getting around them.
First and foremost of the issues I ran into was the network driver which vmware won’t work without. Evidently, vmware dropped the Realtek 8168 / 8111 support starting wit vmware 5.5. Adding insult to injury, it was blacklisted in 6.0 so the slipstreaming the 5.1 driver into the 6.0 iso flat out didn’t work. I did manage to find a work around which I am going to detail here to save some time. Much of this was obtained from the VMware Front website which you cab peruse for further details. Let’s get to it.
Power Shell Preparation
- You’ll need a working Windows Powershell environment at version 3.0 or above. If your running Win 7 as I am and never used powershell you’ll need the Windows Management Framework 5.1 upgrade available here. Download and install per the instructions to get powershell up to it’s current version. You won’t be able to proceed without it as you will subsequently see.
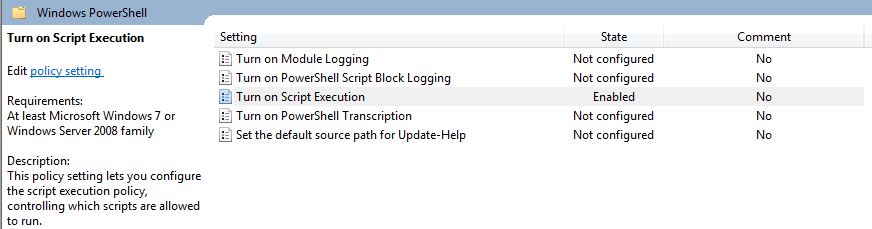
- Before using powershell you may need to set some permissions first. In the Start/Search box type gpedit.msc to open the group policy editor. Navigate to Computer Configuration –> Administrative Templates –> Windows Components –> Windows Power Shell and change the Turn On Script Execution to Enabled. This lets power shell run the scripts necessary for the vmware install.
- Open up Powershell and at the command prompt type set-executionpolicy unrestricted and answer y at the prompt. The scripts you are about to use won’t run properly without this.

- Next up is installing the the Vmwares PowerCLI module from the script gallery. This is accomplished by using:
Install-Module VMware.PowerCLI -Scope CurrentUser
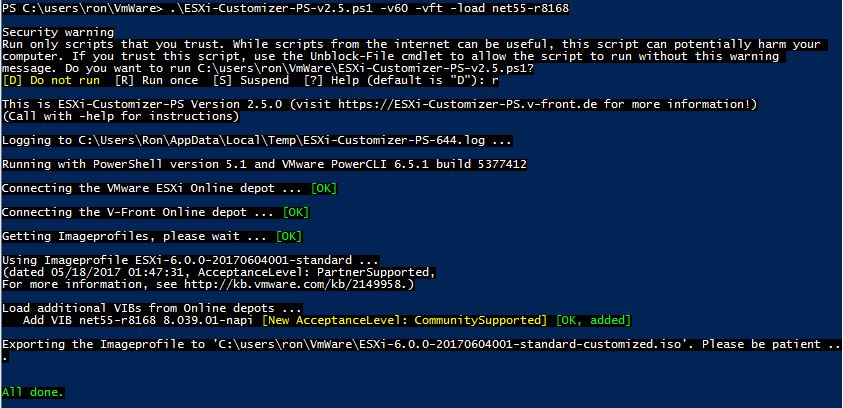
at the command prompt. Once that’s installed, you’re almost home. - Finally, there’s the driver installation. Be aware, this is a community supported driver and not an official VmWare driver. To do this you’ll need the ESX customizer script available here . Download ESXi-Customizer-PS-v2.3.ps1 and save to a convenient directory.
- From powershell prompt, navigate to the directory the script is in, and run .\ESXi-Cutomizer-PS-v2.3.ps1 -v60 -vft -load net55-r8168 .Version 6.0 hypervisor will be fetched and will stick the network driver in it to make a brand new installation ISO which is named ESXi-6.0.0-20170604001-standard-customized.iso.
-
Installation
Burn the installation ISO to either a CD or USB stick, plug into your white box and reboot. The installer will lead you through the installation and is pretty self explanatory. You’ll need to set a root password, and if you don’t have a dhcp server with all your network parameters all set up, it’ll prompt you to set them up. After VMWare installs itself, unplug the boot media and let the installer reboot. Once that’s complete, open a browser on a remote machine to the IP address indicated on the white box and install the V-Center tools. Relax, have a beverage of choice, and get ready to install your VM’s. Stay tuned for more on that later.
Finally
A VMWare 6 White Box Solution provides a lot of capabilities for a good price. Power savings are obvious, and though it may not be a high end server it can do some great things. The 3.1 version I set up years ago ran for 8 years before the motherboard toasted itself. Next, we’ll take a look at some client installs and an approach for backing up the installed VM’s. For some further reading I suggest you have a good look at Andreas Peetz’s VM Front Experience website. A lot of this article is based on some of his work, and the site is just chock full of info. Definite book marker.
73’s
Ron
Recent Comments